Git 的基础使用与jupyter端口转发
torch-geometric
在官网上查看pytorch-geometric的安装方法
For PyTorch 1.6.0 and CUDA 10.2, type:
1 | pip install torch-scatter==latest+cu102 -f https://pytorch-geometric.com/whl/torch-1.6.0.html |
Git 的基础使用-学会这个就能畅玩Github
简单粗暴一点
1 | git clone |
http://www.ruanyifeng.com/blog/2014/06/git_remote.html?bsh_bid=458247941
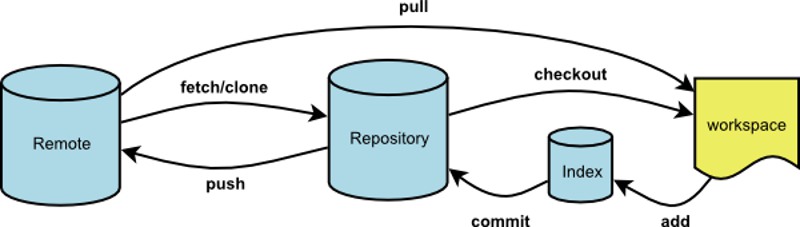
Git有很多优势,其中之一就是远程操作非常简便。
- git clone
- git remote
- git fetch
- git pull
- git push
本文针对初级用户,从最简单的讲起,但是需要读者对Git的基本用法有所了解。同时,本文覆盖了上面5个命令的几乎所有的常用用法,所以对于熟练用户也有参考价值。
分支操作branch
(1)使用命令git branch -a 查看所有分支
注: 其中,remote/origin/master表示的是远程分支
查看当前所有分支
1 | git checkout |
不按回车,按空格+tab键就能查看当前所有本地的分支
(2)删除远程分支
注:如上所示,使用命令 git push origin –delete Chapater6 可以删除远程分支Chapater6
再次使用命令 git branch -a 可以发现,远程分支Chapater6已经被删除。
(3)删除本地分支
使用命令,git branch -d Chapater8 可以删除本地分支(在主分支中)
提交本地代码到远程分支
- Add-添加本地需要提交的代码
1 | git add . |
- Commit-提交代码到本地仓库
1 | git commit -m "提交代码的注 |
- push提交代码
1 | git push -u origin add_loss |
设置 jupyter notebook 可远程访问(完全可以用vscode代替,还没搞)
端口转发
生成密钥
进入 IPython 交互IDE,为 Jupyter 创建密钥。
1 | >> from notebook.auth import passwd |
设置配置文件
看了网上其他人的策略通常是直接修改配置文件 ~/.jupyter/jupyter_notebook_config.py ,但是个人不推荐这种做法,因为这样需要改动到默认的配置文件。
我推荐的做法是自行创建一个配置文件,然后在运行 Jupyter notebook 的时候动态加载配置信息。
创建配置文件,可以取名为 jupyter_config.py 。
配置内容如下:
1 | c.NotebookApp.ip = 'localhost' # 指定ip地址,示例设置可以保护网址 |
启动 Jupyter 服务器
接下来运行 Jupyter 。
1 | $ jupyter notebook --config=jupyter_config.py |
所以为了让程序能忽视 hangup 信号,可以使用 nohup 命令。同时还要配合 & 来将程序放入后台运行。
1 | $ nohup jupyter notebook --config=jupyter_config.py & |
SSH 端口转发
1 | ssh -L <local port>:<remote host>:<remote port> <SSH hostname> |
最终操作
step1:cd到你想打开文件夹的位置
step2:jupyter notebook –config=/root/config.py –allow-root
step3:ssh -L 4000:localhost:8888 -p 2087 root@10.7.13.35
step4:在浏览器中输入http://localhost:4000/
关闭:
通过在服务器主页上选中 notebook 旁边的复选框,然后点击“Shutdown”,就可以关闭各个 notebook。
通过在终端中按 Ctrl + C(Mac及Linux上是按两次Ctrl + C),可以关闭整个服务器
Warning!目前还有局限,jupyter notebook操作还未完全掌握
关闭jupyter notebook 进程
查看linux初体验中进程控制
linux服务器指定GPU方法
命令 nvidia-smi 查看当前GPU使用情况
1.在终端执行程序时指定GPU
CUDA_VISIBLE_DEVICES=0 python your_file.py # 指定GPU集群中第一块GPU使用,其他的屏蔽掉
CUDA_VISIBLE_DEVICES=1 Only device 1 will be seen
CUDA_VISIBLE_DEVICES=0,1 Devices 0 and 1 will be visible
CUDA_VISIBLE_DEVICES=”0,1” Same as above, quotation marks are optional 多GPU一起使用
CUDA_VISIBLE_DEVICES=0,2,3 Devices 0, 2, 3 will be visible; device 1 is masked
CUDA_VISIBLE_DEVICES=”” No GPU will be visible
2.在Python代码中指定GPU
import os
os.environ[“CUDA_VISIBLE_DEVICES”] = “0” #指定第一块gpu
3.设置定量的GPU使用量
config = tf.ConfigProto()
config.gpu_options.per_process_gpu_memory_fraction = 0.9 # 占用GPU90%的显存
session = tf.Session(config=config)