写在最前面的话:大家都是初学linux,希望大家熟练使用搜索引擎,一起进步!

Linux从这开始 | Fei’s Blog (yang-zhifei.github.io)

服务器使用教程 | 鱼摆摆的blog (ybb-ybb.github.io) 密码123456

怎样使用portainer即远程连接服务器

第一步:连接校内网/使用vpn服务

第二步:登入portainer,输入网址http://服务器地址:9000

  • NAS 10.8.130.30
  • 第一台10.7.25.78
  • 第二台10.7.44.154
  • 第三台10.7.28.47
  • 对应portainer界面地址: 10.7.xx.xx:9000
  • 远程登入服务器

创建container

参照于冰冰师兄的教程

服务器所使用的网页就是docker

在docker配置页面中,选择你想要安装的镜像,创建属于你的docker

注意:

  • 个人数据都放在data文件夹或者nas文件夹下,强烈建议创建自己名字的文件夹,防止误删数据

    例如/nas/data/yzf

  • 使用nas储存数据

视频分享链接: http://pan.dlut.edu.cn/share?id=t957hutgq5d4 提取密码:UTZE

开启ssh服务

cat /etc/ssh/sshd_config //查看是否有sshd_config文件

如果没有这个文件,那就安装服务

apt-get install openssh-server //安装sshd-server

ssh就是为了连接windows或者其他机器—–>服务器的一个方法

设置ssh端口

为防止端口号重复,请使用自己的端口

罗金铭 1001— 1050

田胜景 1051— 1100

周骏 1101— 1150

谭红臣 1151— 1200

孔雨秋 1201— 1250

陈宝玉 1251— 1300

张怡 1301— 1350

王诗瑶 1451— 1500

于冰冰 1551— 1600

卞瑜昊 1601— 1650

薛怡 1651— 1700

肖贺文 1701— 1750

徐子涵 1901— 1950

刘彬 1951— 2000

杨志飞 2001-2050

张淑慧 2051-2100

韩磊 2101-2150

赵宪通 2151-2200

李琦 2201-2250

吴嘉莹 2251-2300

蔡恒 2301-2350

张童 2351-2400

冯冬卫 2401-2450

韩一男 2451-2500

简俊桃 2501-2550

李姗 2551-2600

第一台、第二台服务器设置端口

在container中输入

vim /etc/ssh/sshd_config

  • 取消Port行的注释,修改为自己的端口号

这里把于冰冰师兄的文件放出来,直接从文件中修改端口号就可以了,不然还要亲自修改很多文件,很难弄

1
2
3
4
5
6
7
8
9
10
11
12
13
14
15
16
17
18
19
20
21
22
23
24
25
26
27
28
29
30
31
32
33
34
35
36
37
38
39
40
41
42
43
44
45
46
47
48
49
50
51
52
53
54
55
56
57
58
59
60
61
62
63
64
65
66
67
68
69
70
71
72
73
74
75
76
77
78
79
80
81
82
83
84
85
86
87
88
89
90
91
92
93
94
95
96
97
98
99
100
101
102
103
104
105
106
107
108
109
110
111
112
113
114
115
116
117
118
119
120
121
122
#	$OpenBSD: sshd_config,v 1.101 2017/03/14 07:19:07 djm Exp $

# This is the sshd server system-wide configuration file. See
# sshd_config(5) for more information.

# This sshd was compiled with PATH=/usr/bin:/bin:/usr/sbin:/sbin

# The strategy used for options in the default sshd_config shipped with
# OpenSSH is to specify options with their default value where
# possible, but leave them commented. Uncommented options override the
# default value.

Port ****
AddressFamily any
#ListenAddress 0.0.0.0
#ListenAddress ::

HostKey /etc/ssh/ssh_host_rsa_key
HostKey /etc/ssh/ssh_host_ecdsa_key
HostKey /etc/ssh/ssh_host_ed25519_key

# Ciphers and keying
#RekeyLimit default none

# Logging
#SyslogFacility AUTH
#LogLevel INFO

# Authentication:

LoginGraceTime 2m
PermitRootLogin yes
StrictModes yes
#MaxAuthTries 6
#MaxSessions 10

PubkeyAuthentication yes

# Expect .ssh/authorized_keys2 to be disregarded by default in future.
#AuthorizedKeysFile .ssh/authorized_keys .ssh/authorized_keys2

#AuthorizedPrincipalsFile none

#AuthorizedKeysCommand none
#AuthorizedKeysCommandUser nobody

# For this to work you will also need host keys in /etc/ssh/ssh_known_hosts
#HostbasedAuthentication no
# Change to yes if you don't trust ~/.ssh/known_hosts for
# HostbasedAuthentication
#IgnoreUserKnownHosts no
# Don't read the user's ~/.rhosts and ~/.shosts files
#IgnoreRhosts yes

# To disable tunneled clear text passwords, change to no here!
#PasswordAuthentication yes
#PermitEmptyPasswords no

# Change to yes to enable challenge-response passwords (beware issues with
# some PAM modules and threads)
ChallengeResponseAuthentication no

# Kerberos options
KerberosAuthentication no
KerberosOrLocalPasswd yes
KerberosTicketCleanup yes
KerberosGetAFSToken no

# GSSAPI options
#GSSAPIAuthentication no
#GSSAPICleanupCredentials yes
#GSSAPIStrictAcceptorCheck yes
#GSSAPIKeyExchange no

# Set this to 'yes' to enable PAM authentication, account processing,
# and session processing. If this is enabled, PAM authentication will
# be allowed through the ChallengeResponseAuthentication and
# PasswordAuthentication. Depending on your PAM configuration,
# PAM authentication via ChallengeResponseAuthentication may bypass
# the setting of "PermitRootLogin without-password".
# If you just want the PAM account and session checks to run without
# PAM authentication, then enable this but set PasswordAuthentication
# and ChallengeResponseAuthentication to 'no'.
UsePAM yes

AllowAgentForwarding yes
AllowTcpForwarding yes
GatewayPorts no
X11Forwarding yes
#X11DisplayOffset 10
#X11UseLocalhost yes
#PermitTTY yes
PrintMotd no
#PrintLastLog yes
#TCPKeepAlive yes
#UseLogin no
#PermitUserEnvironment no
#Compression delayed
#ClientAliveInterval 0
#ClientAliveCountMax 3
#UseDNS no
#PidFile /var/run/sshd.pid
#MaxStartups 10:30:100
#PermitTunnel no
#ChrootDirectory none
#VersionAddendum none

# no default banner path
#Banner none

# Allow client to pass locale environment variables
AcceptEnv LANG LC_*

# override default of no subsystems
Subsystem sftp /usr/lib/openssh/sftp-server

# Example of overriding settings on a per-user basis
#Match User anoncvs
# X11Forwarding no
# AllowTcpForwarding no
# PermitTTY no
# ForceCommand cvs server

为防止端口号重复,请使用自己的端口——-

第三台服务器设置端口

桥接ssh

保存后 service ssh start

错误:启动ssh服务时,提示Could not load host key: /etc/ssh/ssh_host_rsa_key

错误:/run/sshd must be owned by root and not group or world-writable.

passwd 修改登录密码

再次 service ssh restart

安装vim

apt-get install vim

vim操作

在编辑完文件之后,按下esc键,在按下!键

  • 输入w - 保存文件,不退出 vim
  • wq -保存文件,退出 vim
  • wq! -强制保存文件,退出 vim
  • vim查找:/+查找词或者?+查找词
  • 创建文件:vim + 文件名

服务器上配置代码环境

连接:

$ ssh -p 端口号 root@10.7.60.40

在服务器中用conda建立自己需要的环境

  • conda env list 查看当前存在哪些虚拟环境
  • 输入nvidia-smi查看可用的显卡
  • 使用 conda create -n your_env_name python=X.X(2.7、3.6等)创建自己的虚拟环境
  • source activate your_env_name(虚拟环境名称),激活自己的环境
  • source deactivate,退出自己的虚拟环境
  • conda list:查看安装了哪些虚拟环境
  • conda remove -n env_name –all 删除虚拟环境操作
  • 在下载东西时候想要暂停ctrl+c

激活环境:

$ source activate env_name

安装pytorch

最新版本:输入上述官网提供的安装命令:

1
conda install pytorch torchvision cudatoolkit=10.1 -c pytorch

安装指定版本torch–先明确torch和torchvision对应

1
2
# CUDA 10.1
conda install pytorch==1.4.0 torchvision==0.5.0 cudatoolkit=10.1 -c pytorch

指定版本+豆瓣源

1
pip install torch===1.6.0 torchvision===0.7.0 -f https://download.pytorch.org/whl/torch_stable.html -i https://pypi.douban.com/simple

在自己的虚拟环境下查看torch版本

1
2
import torch
print(torch.__version__) #注意是双下划线

失败然后更改下载源:北外和上交源

https://mirrors.bfsu.edu.cn/

1
2
3
4
5
6
7
8
9
10
11
12
13
14
15
16
17
channels:
- defaults
show_channel_urls: true
channel_alias: https://mirrors.bfsu.edu.cn/anaconda
default_channels:
- https://mirrors.bfsu.edu.cn/anaconda/pkgs/main
- https://mirrors.bfsu.edu.cn/anaconda/pkgs/free
- https://mirrors.bfsu.edu.cn/anaconda/pkgs/r
- https://mirrors.bfsu.edu.cn/anaconda/pkgs/pro
- https://mirrors.bfsu.edu.cn/anaconda/pkgs/msys2
custom_channels:
conda-forge: https://mirrors.bfsu.edu.cn/anaconda/cloud
msys2: https://mirrors.bfsu.edu.cn/anaconda/cloud
bioconda: https://mirrors.bfsu.edu.cn/anaconda/cloud
menpo: https://mirrors.bfsu.edu.cn/anaconda/cloud
pytorch: https://mirrors.bfsu.edu.cn/anaconda/cloud
simpleitk: https://mirrors.bfsu.edu.cn/anaconda/cloud

上交https://mirrors.sjtug.sjtu.edu.cn/

1
2
3
4
5
6
7
8
9
10
11
12
13
14
15
16
17
18
channels:
- defaults
show_channel_urls: true
channel_alias: https://anaconda.mirrors.sjtug.sjtu.edu.cn/
default_channels:
- https://anaconda.mirrors.sjtug.sjtu.edu.cn/pkgs/main
- https://anaconda.mirrors.sjtug.sjtu.edu.cn/pkgs/free
- https://anaconda.mirrors.sjtug.sjtu.edu.cn/pkgs/mro
- https://anaconda.mirrors.sjtug.sjtu.edu.cn/pkgs/msys2
- https://anaconda.mirrors.sjtug.sjtu.edu.cn/pkgs/pro
- https://anaconda.mirrors.sjtug.sjtu.edu.cn/pkgs/r
custom_channels:
conda-forge: https://anaconda.mirrors.sjtug.sjtu.edu.cn/conda-forge
soumith: https://anaconda.mirrors.sjtug.sjtu.edu.cn/cloud/soumith
bioconda: https://anaconda.mirrors.sjtug.sjtu.edu.cn/cloud/bioconda
menpo: https://anaconda.mirrors.sjtug.sjtu.edu.cn/cloud/menpo
viscid-hub: https://anaconda.mirrors.sjtug.sjtu.edu.cn/cloud/viscid-hub
atztogo: https://anaconda.mirrors.sjtug.sjtu.edu.cn/cloud/atztogo

卸载torch

1
2
3
conda uninstall pytorch
或者
pip uninstall torch

文件拷贝,即windows和Linux互传文件

现在环境配好了,你肯定要下载数据集了—-注意放在data文件夹下

可以使用SFTP文件格式进行文件拷贝:

例如:

windows系统可以使用winscp 等

winscp———-windows主机远程连接linux服务器

我们主要说PC是windows上的操作。首先,我们要下一个用于ssh连接的工具,个人推荐的是winscp。
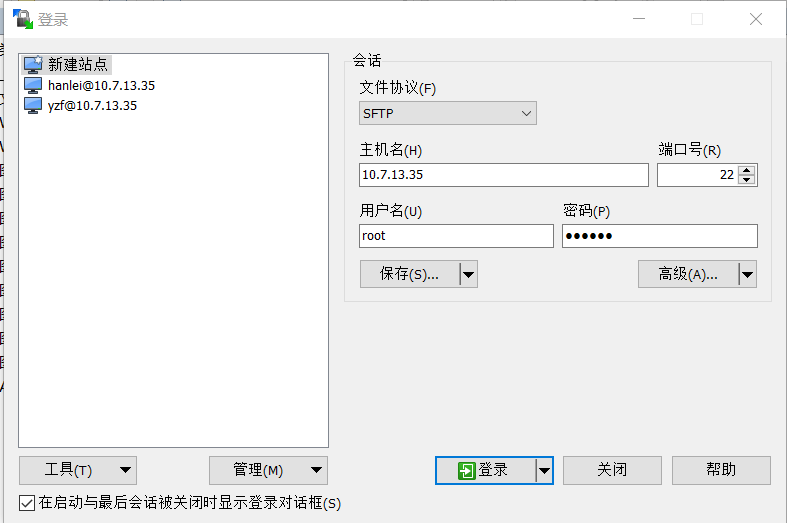
1
2
3
4
主机名:服务器地址
端口号:你自己的端口
用户名:root
密码:root的密码 自己设置

如果出现错误,请检查sshd_confg文件

附录:如何解决SSH连接 “Connection Refused”报错////WinSCP连接linux系统root登录时拒绝访问解决办法

1、确定你已经在服务器创建账号

2、查看是否有ssh-config文件

3、编辑vim /etc/ssh/sshd_config

4、将PermitRootLogin 的值改成 yes

5、将PermitEmptyPassword 的值改成 no

6、重启ssh:service ssh restart

https://www.wbolt.com/how-to-fix-ssh-connection-refused.html

Bash就是linux命令?

首先了解下shell,Shell 是一个用 C 语言编写的程序,它是用户使用 Linux 的桥梁。Shell 既是一种命令语言,又是一种程序设计语言。

bash(全称 Bourne Again Shell): LinuxOS 默认的,它是 Bourne Shell 的扩展。

linux文件管理-直接使用sftp命令即可

  • 查看目录下所有文件ls

  • 创建文件夹mkdir filename

  • 创建文件

  • 查看当前路径pwd

  • 进入文件夹 cd 文件夹名称

  • 退出文件夹

    cd .. 上层目录
    cd 是home目录
    cd / 根目录

1
2
3
4
5
6
7
8
9
10
11
12
13
14
15
16
# SCP拷贝文件夹需要添加参数-r 

# 电脑中的文件拷贝到容器中,port为端口号
$ scp -P port /dir/filename root@10.7.××.××:/dir
# 容器中的文件拷贝到电脑上
$ scp -P port root@10.7.××.××:/dir/filename /dir
###########################分割线###############################
# 或使用sftp命令,更加方便 $ sftp -p port root@10.7.××.××
# 查看本地目录 $ lpwd
# 查看远程目录 $ pwd
# 查看本地目录下文件及文件夹 $ lls
# 查看远程目录下文件及文件夹 $ ls
# 切换本地目录 $ lcd /dir
# 切换远程目录 $ cd /dir
# 上传文件 $ put file
# 上传文件夹 $ put -r dir

linux代码管理

笨办法:可以将代码拷贝到服务器内,在容器中用命令运行程序,用vim修改代码或本地改好代码后将代码传到服务器上

法二:也可以用Pycharm(必须要专业版)同步本地和容器中的代码(实际上使用的sftp协议)

  • File–>Settings–>Project–>Project InterPreter–>小齿轮–>Add–>SSH Interpreter

法三:vs code简单上手快,三种设备都能连,以我目前的水平体会不到它的缺点

高阶操作

linux 重命名文件(夹)//移动文件(夹)

例子:将目录A重命名为B

mv A B

例子:将/a目录移动到/b下,并重命名为c

mv /a /b/c

linux软链接-减少文件重复下载,利用公用data文件(有风险,谨慎操作)

软链接:在Linux系统下,对文件或者文件夹建立一个映射关系。

硬链接:相当于直接复制

建立:ln -s a b

  • 产生虚拟的b文件夹,把a链接到b,b->a
  • 注意a不要加/

删除:rm -rf b

  • 原来存在的形式:b->a
  • **删除时不能加/**,除非你要把文件夹全部删除

ln -s 软链接产生Too many levels of symbolic links错误

解决方法:在使用ln -s命令时,使用绝对路径取代相对路径,绝对路径是指在/下的路径,注意非/root

【linux命令如何查看文件、文件夹的属性,包括大小、修改时间、谁修改的】

1、查看当前目录总共占的容量,而不单独列出各子项占用的容量

1
du -sh

2、查看当前目录下一级子文件和子目录占用的磁盘容量:

1
du -lh --max-depth=1

3、统计当前文件夹(目录)大小,并按文件大小排序:

统计当前文件夹(目录)大小:du -sh *

1
du -sh \* | sort -n

4、查看指定文件大小

可以使用du -sh或du -a:

1
du -sh installmongofor3.6.log

5、查看指定文件,文件夹属性:

#ls -l filename
#ls -ld foldername

6、查看文件的三个时间 atime ,ctime, mtime

查看、关闭当前服务器上启动服务 / 进程

  • ps -aux 查看当前进程,整个列表最 后一列 COMMAND 会显示出启动服务的命令,注意pid

  • ps -aux | grep jupyter 查看运行的jupyter进程

  • 找到要关闭的服务进程

  • kill 进程pid

    或者 kill -9 进程pid

后台运行程序

1、nohup 命令

  • 用途:Run COMMAND, ignoring hangup signals.
  • 语法: nohup COMMAND [ARG]...&
  • 输出文件:nohup忽略hangup信号地运行程序,程序的输出默认重定向到当前文件夹下的 ‘nohup.out’ 文件中。如果要查看 jupyter notebook 的日志文件,可以打开 ‘nohup.out’ 文件进行查看。可以使用 vim、head、tail、cat 等命令进行查看。

进程控制-tmux

在服务器上写代码,跑程序或者下载东西时,经常遇到自己断网的情况

1
2
#Ubuntu和Debian上安装Tmux
apt install tmux

Tmux 是一个终端复用器

命令行的典型使用方式是,打开一个终端窗口(terminal window,以下简称”窗口”),在里面输入命令。用户与计算机的这种临时的交互,称为一次”会话”(session)

会话的一个重要特点是,窗口与其中启动的进程是连在一起的。打开窗口,会话开始;关闭窗口,会话结束,会话内部的进程也会随之终止,不管有没有运行完。

Tmux 就是会话与窗口的”解绑”工具,将它们彻底分离。

(1)它允许在单个窗口中,同时访问多个会话。这对于同时运行多个命令行程序很有用。

(2) 它可以让新窗口”接入”已经存在的会话。

(3)它允许每个会话有多个连接窗口,因此可以多人实时共享会话。

(4)它还支持窗口任意的垂直和水平拆分。

tmux用法

‘tmux’命令会启动 Tmux 窗口,底部有一个状态栏。状态栏的左侧是窗口信息(编号和名称),右侧是系统信息。

会话起名。

1
tmux new -s <session-name>

分离会话

  • tmux detach
  • 上面命令执行后,就会退出当前 Tmux 窗口,但是会话和里面的进程仍然在后台运行。

tmux ls`命令可以查看当前所有的 Tmux 会话

tmux attach命令用于重新接入某个已存在的会话。

1
2
3
4
5
# 使用会话编号
$ tmux attach -t 0

# 使用会话名称
$ tmux attach -t <session-name>

tmux kill-session命令用于杀死某个会话。

1
2
3
4
5
# 使用会话编号
$ tmux kill-session -t 0

# 使用会话名称
$ tmux kill-session -t <session-name>

tmux switch命令用于切换会话。

1
2
3
4
5
# 使用会话编号
$ tmux switch -t 0

# 使用会话名称
$ tmux switch -t <session-name>

查看tmux中的终端输出记录

使用以下指令进入copymode模式即可:

1
ctrl + b + [

按q退出

窗格操作

tmux split-window命令用来划分窗格。

1
2
3
4
5
# 划分上下两个窗格
$ tmux split-window

# 划分左右两个窗格
$ tmux split-window -h

移动光标

tmux select-pane命令用来移动光标位置。

1
2
3
4
5
6
7
8
9
10
11
# 光标切换到上方窗格
$ tmux select-pane -U

# 光标切换到下方窗格
$ tmux select-pane -D

# 光标切换到左边窗格
$ tmux select-pane -L

# 光标切换到右边窗格
$ tmux select-pane -R

交换窗格位置

tmux swap-pane命令用来交换窗格位置。

1
2
3
4
5
# 当前窗格上移
$ tmux swap-pane -U

# 当前窗格下移
$ tmux swap-pane -D

教程http://www.ruanyifeng.com/blog/2019/10/tmux.html

liunx系统

切换输入法

用ctrl+空格或者ctrl+shift

安装软件(appimage格式)

法一:图形化界面右键选择属性——-菜单里点击权限——所有者选择可读写—–数字3选择可执行——双击appimage文件运行

法二:终端输入cd+文件所在路径——输入命令||———-输入命令运行软件./+Appimage文件名

安装软件(deb格式)

  • sudo dpkg -i file # 安装.deb文件(类似windows中的exe文件)

  • chmod 777 file # 开放文件权限

  • chmod 777 -R file # 开放文件夹权限

检查软件是否成功安装

dpkg -s firefox

windows

Windows在当前路径下打开Powershell或cmd窗口

只需要在当前目录下”shift+鼠标右键”

windows定时关机

win+R打开运行界面

输入cmd

shutdown -s -t 1800

shutdown -a取消定时

windows terminal配色

自动补全Tab键

然后这里还有一个非常实用的东东:https://github.com/shanselman/WindowsTerminalHere

  • 下载后,右击 WindowsTerminalHere.inf, 选择 安装,之后再在文件资源管理器里面任意一个文件夹内右击,上下文菜单中都会增加一项 Open Windows Terminal Here 的选项。
  • 设置文件的位置——–C:\Users\Administrator\AppData\Roaming\Code\User
1
2
3
4
5
6
7
8
9
10
11
12
13
14
15
16
17
18
19
20
21
{
"name": "Xterm.js Default",
"black": "#2E3436",
"red": "#CC0000",
"green": "#4E9A06",
"yellow": "#C4A000",
"blue": "#3465A4",
"purple": "#75507B",
"cyan": "#06989A",
"white": "#D3D7CF",
"brightBlack": "#555753",
"brightRed": "#EF2929",
"brightGreen": "#8AE234",
"brightYellow": "#FCE94F",
"brightBlue": "#729FCF",
"brightPurple": "#AD7FA8",
"brightCyan": "#34E2E2",
"brightWhite": "#EEEEEC",
"background": "#000000",
"foreground": "#FFFFFF"
}

不喜欢就换配色https://windowsterminalthemes.dev/

1
2
3
4
5
6
7
8
9
10
11
12
13
14
15
16
17
18
19
20
21
22
23
{
"name": "BirdsOfParadise",
"black": "#573d26",
"red": "#be2d26",
"green": "#6ba18a",
"yellow": "#e99d2a",
"blue": "#5a86ad",
"purple": "#ac80a6",
"cyan": "#74a6ad",
"white": "#e0dbb7",
"brightBlack": "#9b6c4a",
"brightRed": "#e84627",
"brightGreen": "#95d8ba",
"brightYellow": "#d0d150",
"brightBlue": "#b8d3ed",
"brightPurple": "#d19ecb",
"brightCyan": "#93cfd7",
"brightWhite": "#fff9d5",
"background": "#2a1f1d",
"foreground": "#e0dbb7",
"selectionBackground": "#563c27",
"cursorColor": "#573d26"
}